- Introduction to Suturing
- Suturing Techniques – Guide (Infographic)
- Suturing Techniques – Indications and Contra-indications
Introduction to Suturing
The primary goal of suturing is to approximate (bring together the wound margins) and to eliminate dead space between wound walls and edges so that underlying tissues are held together. Healing can only occur properly if the two severed areas of tissue align and remain intact. If dead space is not eliminated blood may pool in the wound leading to hematoma and consequently wound strength will be compromised, increasing the risk of infection.
The secondary goal of suturing is minimizing scar tissue formation. Both proper healing and minimal scarring are achieved by accomplishing two main objectives.
The first is ensuring that wound edges are not inverted during closure. Inversion occurs when the epidermis on either side of the wound curls inwards and touches the epidermis on the opposite side. Inversion will delay and/or compromise the healing process and leave an unsightly scar. Therefore, it is vital to proper wound healing and scar reduction to suture wounds so that edges are everted, or slightly lifted outwards.
The second objective is to achieve the best wound edge approximation. This is the process of ensuring that edges are brought together as evenly as possible during suturing. Eliminating dead space and achieving wound edge eversion and approximation are key elements for the proper healing and minimal scarring of a sutured wound.
The suture needles, materials, and techniques selected are at the discretion of the surgeon or medical professional assessing the wound. The medical professional will select the appropriate needle, suture material, and suture technique depending on whether or not they want to achieve deep tissue dead space closure, lesser or greater wound tensile strength, less scarring, ease of application or care, etc.
Keep in mind that new non-suturing closure methods are being developed that may be used as alternatives to suturing closure methods. In some situations non-suturing methods are better options than traditional suturing approaches. New methods include absorbable staples, sterile strips, and topical adhesives which can be used in combination with applied suture techniques or alone. Again, the type of suture technique or method must be determined by the treating physician or medical professional with the goal of achieving optimal wound healing and minimal scarring.
Although the use of ‘Steri-Strips’ and ‘suturing glue’ is tempting, it can only be used in very superficial wounds. Otherwise one gets a void below the surface along with associated problems like wound inversion, hematoma formation, wound infection, and wound dehiscence. It is tempting to use these shortcuts in the pediatric trauma patient, especially under the pressure that exists treating a child in the emergency room. If in doubt, suture properly under anesthetic for improved healing and an aesthetically pleasing result.
Choosing the correct suturing technique
The main driver of choice of technique in suturing is the operator’s/surgeon’s personal choice in a specific situation. He/she may gravitate to a specific technique, or combination of techniques, based on his/her knowledge, suturing proficiency, availability of specific suturing materials like suturing thread and needles, and experience gathered over the years. The medical professional will also take into account what works best in his/her hands.
No specific technique fulfills the exact requirements of a specific would closure.
Suturing Techniques – Guide (Infographic)

Suturing Techniques – Indications and Contra-indications
Here are some guidelines for the inexperienced to help you decide on which suturing technique to use.
Simple Sutures
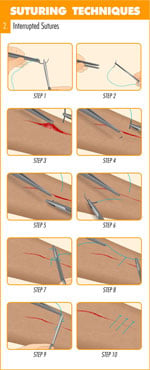
Interrupted sutures
Interrupted sutures are sutures that are placed and tied individually. For the inexperienced this is the preferred technique due to its ability to close a wound cleanly and securely. If infection occurs in one part of the wound only a few interrupted sutures need be removed to treat the wound leaving other sutures intact. The downside is that interrupted sutures take considerably more time to place than continuous sutures.
Individual interrupted sutures also bring a limited quantity of tissue towards the closure margin – and thus in friable tissue it has a higher tendency to “pull through” when tying the knot.
It is usually not the end of the world if one interrupted suture should loosen or dehisce as the remainder of the interrupted sutures will keep the wound closed. One would not even have to replace a single interrupted suture if it loosens up so long as the resulting dehiscence is minimal and not in a critical area.
Interrupted sutures will also give a good result in curved and non-linear wounds/incisions. Unlike running sutures it will not distort the form of the wound.
Interrupted sutures offer the highest level of control over wound closure and the result. If you perceive that a specific suture is not ideally placed you can remove it and place it in a better position, unlike the running/continuous sutures where you may need to redo the entire running suture. With the interrupted suture you have excellent control over the level of wound eversion.
An unfortunate downside of using an interrupted suture is that the operator has to push the needle through healthy skin adjacent to the wound margins. This brings with it the possibility of leaving needle marks in the form of a visible row of small scars on either side (cross hatching suture marks) next to the wound margin. In esthetically sensitive areas, like the face, a surgeon will remove stitches/sutures by day 4 or 5 and secure the wound with Steri-Strips for another couple of days in an effort to avoid cross hatching scars. Do not leave interrupted facial sutures in for longer than 7 days.
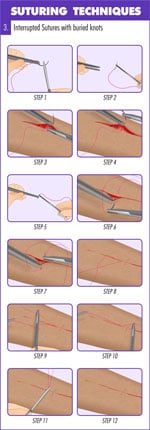
Interrupted sutures with buried knots
In sensitive areas, like a tongue laceration, use the interrupted sutures with buried knots. This technique will avoid irritating the area with the 2 free ends left by a normal interrupted suture. Keep in mind that the knots may take a bit longer to resorb due to the increased amount of suture material left inside the wound. Always use absorbable sutures when using this technique.
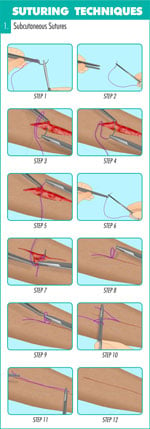
Subcutaneous sutures
The subcutaneous suture is similar to the interrupted sutures with buried knots, but it is placed in the depth of the tissue in a surgical or traumatic wound. This suturing technique is primarily used to eliminate dead space in the depth of a wound. By default, always use absorbable sutures when using this technique
Figure-of-8 sutures
The (vertical) ‘Figure of 8 suture’ is a combination of a subcutaneous and a surface skin suture. Use this suture to save a bit of time when closing a long incision. In essence, it is a “combo-interrupted subcutaneous and skin closure suture.”
Step-by-step guide to placing simple sutures
Running (continuous) sutures
A running suture, also known as a continuous suture, consists of one strand of suture material that runs for a lengthy distance along a wound, normally in a zigzag pattern, which is tied at either end. This suture resembles those used on baseballs, and so, they are sometimes called baseball sutures. Running (continuous) sutures provide an adequate closure with even tension distribution as well as saving both time and suture material. This technique is commonly used when the wound is actively bleeding and saving time is critical, such as a scalp laceration. The disadvantage is that suture breaks can cause wound gaps to occur.
Use running sutures when esthetics are not important and when you want to save time. Running sutures tend to bunch-up the tissue and shorten the wound length due to the tension needed to keep the wound margins together. Use the running suture on an actively bleeding scalp wound when fast action is important to minimize blood loss. Since a wound of this nature is in the hairline, in most cases the cosmetic result is usually not critical.
Running sutures spread the suture tension evenly throughout the wound – and this may be important when working with tissue that has a soft consistency.
If the suture material breaks in a running suture, the whole wound will break down so be sure to secure the knots on the 2 sides and consider adding a couple of strategically placed interrupted sutures in addition to the running suture.
Continuous interlocking sutures
This suture technique is accomplished by passing the needle through the loop created by the previous suture, locking it into place. Continuous locking sutures are commonly used for breast reconstructions, intestinal surgeries, and hernias, where soft tissue requires secure stitching. The downside is when used externally on the skin permanent hatch marks may remain.
There is very little difference between regular running and interlocking running sutures. The latter tends to seal the wound margins better, which may be important in closing a wound between two cavities, e.g. closing the incision between the oral and nasal cavities following a Le Fort 1 osteotomy.
Subcuticular sutures
Apposition of the wound edge is easily achieved using the subcuticular continuous suture. Minimal scarring occurs because external sutures are not used. Rather, the subcuticular suture is applied under the epidermis using either an absorbable suture or a non-absorbable suture leaving external knots at the far ends of the laceration or incision so that the suture can be removed easily. When applied correctly, subcuticular continuous sutures provide the best outcome for cosmetic results. The drawback is that the procedure is extremely time-consuming. However, ,the sutures are easily removed, making it a common technique to use on children.
The subcuticular suture will allow for a very pleasing esthetic result in most cases, but it offers very little wound eversion by itself. Surgeons will have to get wound eversion by properly placing the subcutaneous sutures if they intend closing the surface with subcuticular sutures. One can either use absorbable or non-absorbable sutures when placing subcuticular sutures. If the choice is a thin Nylon suture remember to remove the suture within 5 days to avoid having to dissect out fragments of suture material from the semi-healed wound margin. When closing, strengthen the wound margins with Steri-Strips if needed.
Purse-string sutures
The purse-sting suture is a running suture used to close round defect wounds or openings. Predictably, the purse-string suture will not give a good cosmetic result because it will bunch-up the tissue. Purse-string sutures are typically used to close circular objects such as an areola or to close the opening after removing a chest drain (instruct the patient to take a deep breath and forcibly exhale against closed nose and lips). The suture material is passed in and out of the tissue as a running stitch and then drawn closed like closing a purse or a bag.
Step-by-step guide to placing running (continuous) sutures
Mattress Sutures
The 3 main reasons for using mattress sutures:
To increase the interphase or contact between the raw surface areas of two opposing wound sides.
This reason is especially important when you want to optimize the time it takes for a wound to heal, especially when one closes a fistula, such as closing an oroantral fistula (an opening between the oral and maxillary sinus cavities).
To enhance eversion.
The mattress suture provides more eversion up to the point where you may get opening of the wound edges. You may consider using the far-near suturing technique which is a variation of the vertical mattress suture.
To bring more volume or quantity of tissue to the closure area.
With a mattress suture, the chances of dehiscence are significantly reduced. However, take care not to tie mattress sutures too tightly as doing so may cause tissue strangulation and result in necrosis of the tissue on the suture-tissue contact areas.
Horizontal mattress sutures
This suturing technique is used to create moderate tension to prevent hemostasis and to improve wound tension strength for better healing. The horizontal mattress is also effective at everting wound edges and provides fair approximation. However, care must be taken to not tighten excessively or tissue ischemia can result.
Vertical mattress sutures
The vertical mattress technique is an excellent choice for achieving wound edge eversion and approximation. The technique can be used on either thin or thick skin and utilizes two bites. The first bite approximates the wound edges and the second reduces edge tension. The downside is that vertical mattress sutures can only remain in place for 5-7 days or risk is high for permanent crosshatch marks.
Near and far sutures
Also called the far-near-near-far suture or the pulley suture, this is a variation of the vertical mattress suture favored by some surgeons.
The far-and-near suture is a modified vertical mattress stitch that uses the tension created by a pulley action to close wound tissue. Because the pulley stitch reduces the surface area of large wounds in which closure cannot be accomplished completely by traditional side-to-side sutures, it is an excellent technique for areas such as the legs and scalp. Pulley sutures can be used as temporary assisting stitches, such as lessening tension for buried sutures, or they can be left in for later removal. If pulley stitches are used they must be removed promptly in order to avoid crosshatch scarring.
Step-by-step guide to placing mattress sutures
Other suturing techniques
Ligature Sutures
This technique is used to suture tubular structures such as blood vessels in order to stop bleeding or reestablish blood flow.
Horizontal Continuous Mattress Sutures
Certain anatomical areas like the retroauricular skin, are prone to wound inversion, and this is an indication for placing horizontal continuous mattress sutures.
Horizontal Half Buried Mattress or 3-Corner Sutures
The horizontal half-buried mattress, or 3-corner suture, is used to close flapped or V-shaped wound edges. This technique is also used to better approximate edges of skin of varying texture or thickness. Also, tissue ischemia is reduced by using the 3-corner suture.
Relaxation Sutures
This suture technique is used when a wound is expected to create excessive tension. A relaxation suture allows for loosening in order to relieve such tension.
Quilting Sutures
This technique is effective at reducing the formation of seroma (swelling or lump in the underlying tissue due to serum accumulation in a localized area). A flap of skin is sutured using multiple stitches to the underlying tendinous expansion sheet (aponeurosis) that normally connects muscle tissue with its movable parts.
Retention Sutures
This technique is used to provide strong reinforcement of deep muscle and fasciae in the wall of the abdomen. Retention sutures lessen tension on the primary suture so that wound disruption is limited. The downside is that retention sutures often cause pain and severe discomfort to patients. According to one study, up to 50 percent of patients receiving retention sutures require premature removal due to complaints of pain.
Frost Sutures
This suturing technique is used during surgeries of the eyelid. Frost sutures prevent the eyelid (mainly the lower eyelid) from turning outward, known as ectropion.
Double-arm Sutures or Cobbler’s Sutures
This technique is preferred by some eye surgeons that desire to vertically or horizontally resect the rectus muscles. The double-arm suture is achieved by using a suture containing a needle at each end.
Gély’s Sutures
Similar to the double-arm suture, Gély’s suture uses suture material with a needle at both ends to close intestinal wounds. It is performed using a continuous stitch.
Czerny’s Sutures
There are two uses for Czerny’s sutures. The first involves suturing only the mucous membrane of the intestines. The second splits ruptured tendon ends and sutures the other end into the created slit much like a male/female coupling design.
Lembert Sutures
The Lembert suture is another technique used in gastrointestinal surgeries. It can be applied as either an interrupted or continuous suture that repairs the collagenous submucosal layer without disturbing the lumen.
Master Suturing Techniques Through The Apprentice Doctor!
There is no need to wait on getting practice with suturing. Before you step into any situation requiring suturing, even an emergency in your own home, you can perfect your suturing skills. The Apprentice Doctor® Deluxe Suture Kit & Online Training Course teaches you how to confidently close wounds. Begin training today!
Surgical Suturing Techniques Mastery Guide (Article written by Dr Anton Scheepers who is a Maxillofacial and Oral Surgeon and founder of The Apprentice Doctor)


This is great! Your diagrams are so helpful. Thank you.
Phlebotomy and IV Skills needed. Kindly assist.
The Apprentice Doctor offers this: https://www.theapprenticedoctor.com/phlebotomy-training-course-and-venipuncture-student-practice-kit/
Thank you so much🌺🌺
Welcome!
exellent
Am studying as a nursing assistant, thank you for your good article it has really helped me in my studies
You are welcome!
I am a student midwife, thank you for is learning article,we appreciate.need more
This was a great info chart
I am a Trauma/Acute Care Surgery, and a PA instructor. This is a very good teaching tool
Imani Williams
Thank you for your kind comment on our website.
We offer a number of suturing kits – with an accompanying certified online course.
Feel free to request an free evaluation kit. https://www.theapprenticedoctor.com/shop/
Course: https://www.theapprenticedoctor.com/elearning/suture/
Other Kits/Courses – STB/Phlebotomy and IV skills Scrub for Surgery training and Fracture reduction.
Best!
Dr. Anton Scheepers
Awesome article, thanks for the illustrations and time put forth
I’m surely appreciate for this article
I’m glad you enjoyed it and found it helpful.
Thanks a lot for this easy to read, educative and knowledge loaded article, kudos to you and more of this will be appreciated.
You are welcome!